by
[user not found]
| Jul 20, 2015
Having a properly working internal vibrator is essential to any job. No one wants to find out on the way to a job site or midway through a job that the internal vibrator you're using aren't working at full capacity or unable to perform within minutes of use.
To achieve this long life, regular maintenance is required. Even the finest concrete vibrator are lost if the proper maintenance instruction is not followed.
This post will help you develop regular maintenance schedule for your internal vibrator.
In this post we're going to examine:
- how to properly make sure your internal vibrator is working correctly and
- how to safely disassemble and reassemble your vibrator
How to Make Sure Your Internal Vibrator is Working Properly
Before we get into disassembly let's first check and see how the vibrator parts are working.
First, it's very important to check your vibrator shaft for any distortion or kinks. If any permanent bend or kink has developed in the shaft, the vibrator will not perform properly and the shaft will need to be replaced.
Next, check to see if the vibrator is operating within its rates/amperage. To do this, connect the vibrator to an ammeter and activate the vibrator. The vibrator should pull the amperage that is marked on the nameplate, or less. If the amps do not drop below the nameplate rating after 15 seconds of running, the shaft and head will need servicing.
Your vibrator should not be operated for more than 15 seconds without the vibrator head inserted into concrete.
After the vibrator motor has been turned off and had a chance to cool, disconnect unit from the power supply. Check the brushes and make sure that they are not sticking and that you have sufficient brush length for continued operation.
Finally, check the rear ventilation holes and make sure that they are clear of concrete or other grime that may accumulate there.
Disassembling and Checking Your Internal Vibrator
 Now we can begin the disassembly process. Your VIBCO internal vibrator was assembled at our factory in Wyoming, Rhode Island and was put together with Loctite Blue 242®, an adhesive for threads and bolts, so the elements would not loosen when the machine is vibrating. As a result, the vibrator might be difficult to take apart initially.
 To disassemble your vibrator for an inspection and cleaning:
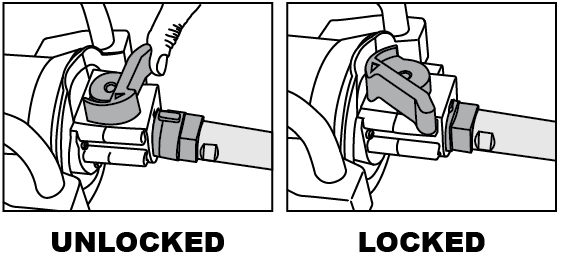
1. Unlatch the shaft from the motor. This is accomplished by:
- Locating the lever on top of the motor unit and
- Pressing in the direction of the arrow on the lever and pull the shaft connector directly out of the motor unit.
At this stage the removing the shaft should not give you too much resistance.
2. Remove the shaft connector. This is accomplished by simply unscrewing it from the shaft.
This may be done by hand, without tools, but on occasion it will be seated so tightly that a couple of adjustable wrenches may be required for disassembly.
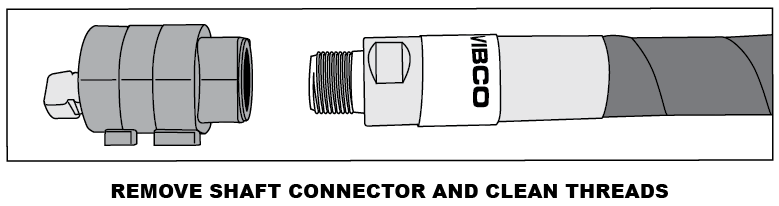
Once the shaft connector (part #1A712) is removed from the shaft. Clean the threads of the shaft removing any remnants of the grease and Loctite® that may be there. Be sure to be on the lookout for wear on the vibrator head and shaft and lubricate the inner shaft after 40 hours of use.
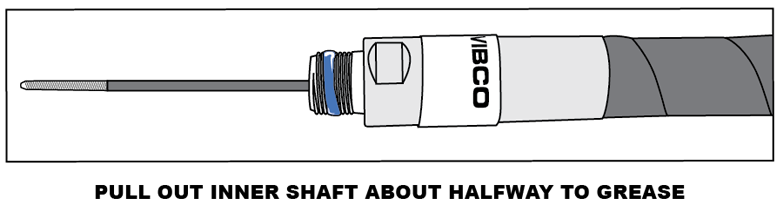
To lubricate the inner shaft of the vibrator:
- Pull the inner shaft out of the housing about half of the vibrator's length. If the vibrator has a 7 foot shaft, pull it out about 3 1/2 feet. Check for signs of wear such as frayed cable or small kinks.
- Apply a liberal coating of grease (1/16th of an inch) to the exposed shaft. We recommend Flexi-Lube grease, available from VIBCO in 1 lb and 5 lb containers, but most good quality flexible shaft greases will work.
- Re-insert the shaft and re-clean the threads if necessary. Apply some Loctite Blue 242® or equivalent and tighten the shaft connector back onto the shaft.
- Open the release lever on the motor unit and re-insert the shaft connector.
- Move the lever into the locked position and you are ready to get back to work.
If you need to check the motor while the shaft is removed, snap the motor 'on and off'. The motor should start quickly and run smoothly. This is a quick snap on and the off. The universal motor of you vibrator is not intended to be run at high speed without a load attached.
Wrap Up
Vibrators are an essential tool when working with concrete. All the more reason to make sure that the internal vibrator you're using for the job is working as it should and delivering it's best.
Developing a consistent maintenance schedule for your internal vibrator is the best thing you can do. Doing so will ensure that your vibrator will deliver the best performance time after time and save money on new parts and new equipment. Following these steps and these maintenance tips every 40 hours of use and operation will ensure just that.